Microsoft Entra On-Premises Application Proxy Deployment Guide: Secure Exposure of Internal Services Under Zero Trust Architecture
I. What is Microsoft Entra On-Premises Application Proxy?
Microsoft Entra On-Premises Application Proxy is a Zero Trust Architecture (ZTA) solution for exposing internal services securely. As a component of Microsoft Entra Global Secure Access, it enables secure access without public IPs or exposed internal ports through a combination of cloud proxies and on-premises connectors. It integrates with Microsoft Entra ID for identity authentication (e.g., SSO, Conditional Access), providing enterprise-grade security for internal applications like Vaultwarden or corporate internal systems.
It addresses the subnet access issues of traditional Mesh VPNs and the security risks of public reverse proxies, while leveraging Microsoft Entra ID’s enterprise identity and security capabilities. This allows rapid, secure exposure of internal applications (e.g., Vaultwarden) to the public internet with "no public IP, no port forwarding" convenience.
II. Why Choose Microsoft On-Premises Application Proxy?
Compared to traditional Mesh VPNs (e.g., Tailscale, Nebula) or public reverse proxies (e.g., Cloudflare Tunnel), Microsoft’s solution better aligns with enterprise/individual security and convenience needs:
1. No Public IP or Subnet Access Required
- Mesh VPNs like Tailscale or Nebula require devices to join the enterprise subnet (e.g., install a client and connect) and rely on public IPs or relay servers. Microsoft’s proxy uses on-premises connectors (lightweight clients deployed internally) to enable cloud-internal communication, eliminating the need for internal devices to expose public IPs.
2. More Secure Public Exposure
- Cloudflare Tunnel directly exposes internal services to the public (via Cloudflare node forwarding), risking scans or attacks. Microsoft’s proxy uses Microsoft Entra ID authentication as a pre-authentication check, check—only authorized users (or devices) can access, and traffic is encrypted end-to-end.
3. Better Domestic Network Stability
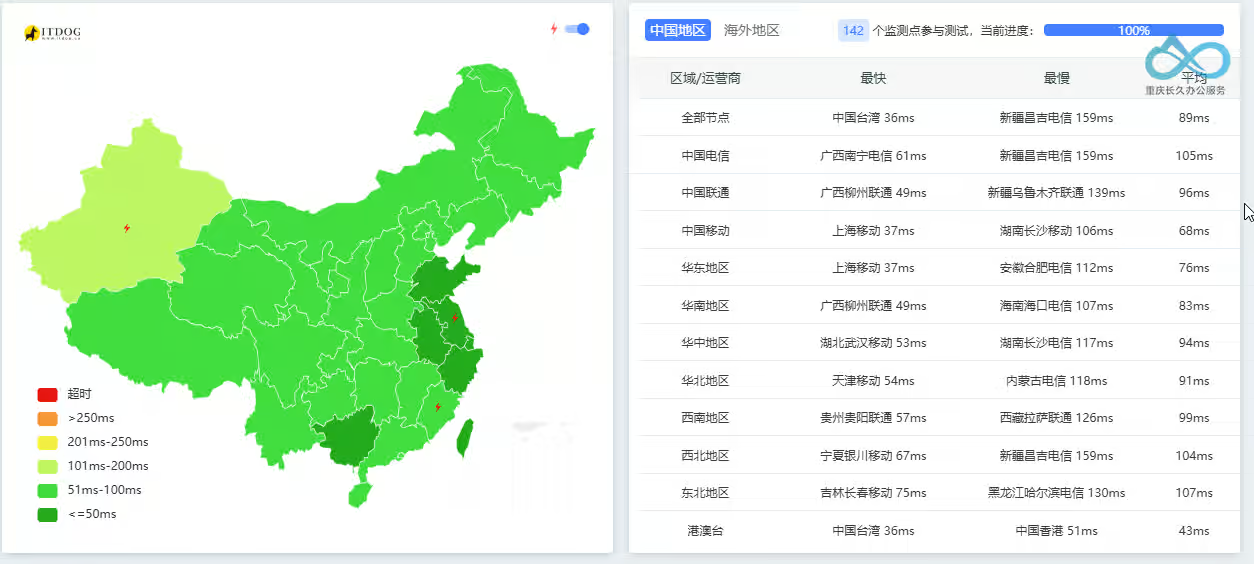
- Cloudflare’s domestic node coverage is limited, leading to high latency in some regions. Microsoft’s cloud services rely on Azure’s global nodes, resulting in lower latency for domestic users (as shown below, Asian connector nodes have ~60-100ms latency, with an average of 60ms on mobile).
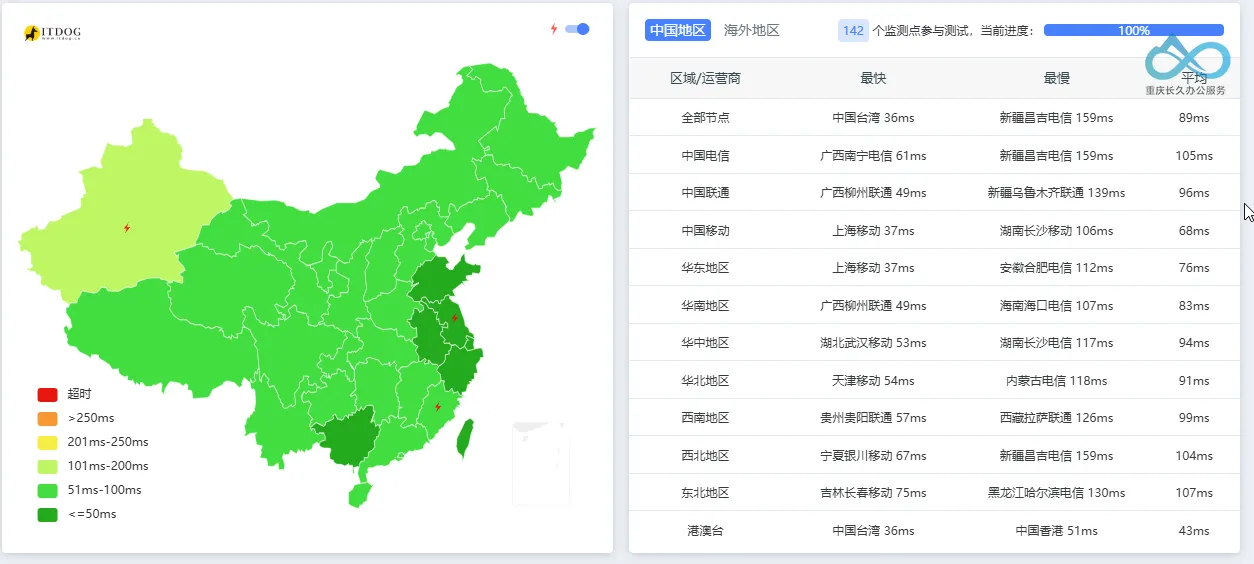
Latency performance of Microsoft On-Premises Application Proxy's Japan node, approximately 60-100ms
4. Integrated Enterprise-Grade Identity and Security
- Single Sign-On (SSO): Users log in via Microsoft Entra ID once and access internal apps without repeated password entries.
- Conditional Access: Set access rules (e.g., only Intune-managed devices, corporate networks, or multi-factor authentication).
- Load Balancing: Achieve high availability for internal apps via multiple connector groups.
III. Architecture and Workflow
The core logic of Microsoft’s On-Premises Application Proxy is bidirectional communication between cloud proxies and on-premises connectors. Below is the detailed authentication and access flow (refer to Microsoft’s official diagram):
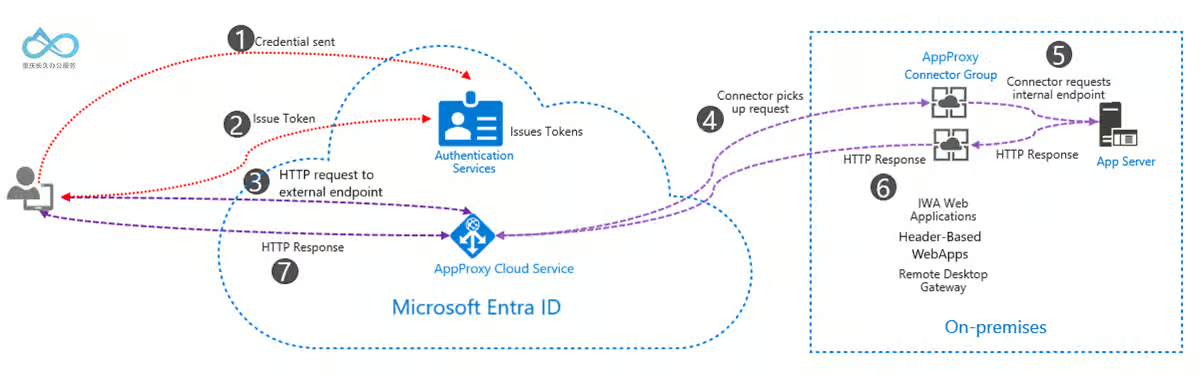
Flow Explanation:
- User Initiates Access: A user accesses an internal app via a custom domain (e.g.,
vaultwarden.changjiu365.com) and is redirected to the Microsoft Entra login page. - Identity Authentication and Conditional Checks: The user enters credentials to log in. Microsoft Entra ID verifies the identity and enforces Conditional Access policies (e.g., checking device compliance or corporate network status).
- Issue Access Token: Upon successful authentication, Microsoft Entra ID sends an OAuth 2.0 access token (containing user identity information) to the user’s device.
- Transmit Token to Cloud Proxy: The user’s device sends the token to the Microsoft On-Premises Application Proxy service, which extracts the User Principal Name (UPN) and Service Principal Name (SPN) from the token.
- On-Premises Connector Forwards Request: The cloud proxy forwards the request to the on-premises connector (deployed internally). The connector verifies the token’s validity and forwards the request to the internal app (e.g., Vaultwarden at
http://192.168.12.100:8880). - Application Response and Return: The internal app processes the request and returns a result. The connector forwards the result to the cloud proxy, which finally returns it to the user.
IV. License Requirements
Microsoft On-Premises Application Proxy requires one of the following Microsoft Entra ID licenses:
- Microsoft Entra ID P1/P2;
Note: This guide uses a Microsoft Entra ID P2 license, which meets the above requirements.

V. Deployment Steps (Using Vaultwarden as an Example)
1. Prerequisites
- Admin Permissions: Microsoft Entra Global Administrator or Application Proxy Administrator privileges.
- Internal Service: A deployed and running internal app (e.g., Vaultwarden with internal address
http://192.168.12.100:8880). - Custom Domain: A registered domain (e.g.,
changjiu365.com) for accessing the internal app. - SSL Certificate: A PFX-formatted certificate (including private key) for the custom domain (used for HTTPS encryption).
2. Create a Dedicated Connector Group
A connector group is a logical grouping of on-premises connectors, used to manage internal apps for different regions or purposes (e.g., "Asia Connector Group" for handling requests from Asian users).
Steps:
- Log in to the Microsoft Entra Admin Center.
- Navigate to Global Secure Access → Private Network Connectors.
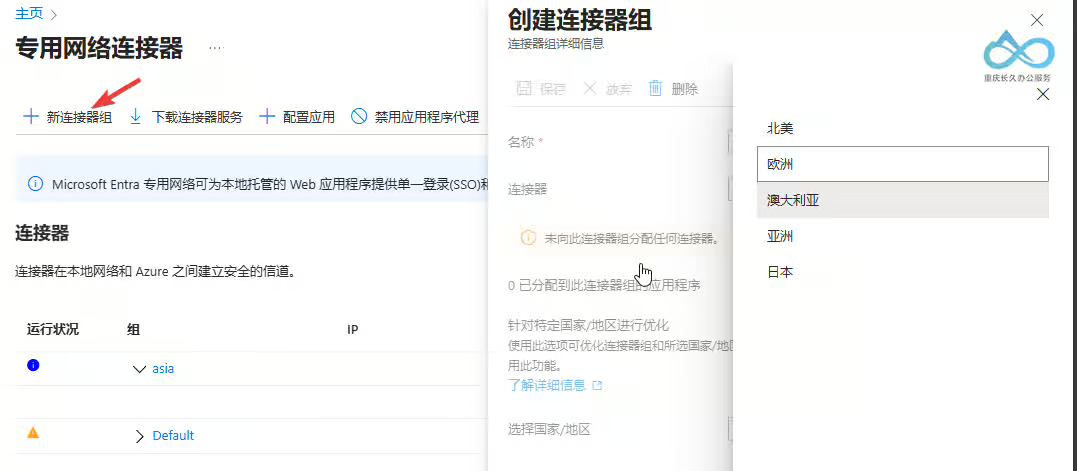
- Click + New Connector Group, enter a group name (e.g., "asia"), select a region (e.g., "Asia"), and click Create. (The connector group determines the node region for access; we chose the Asia node, which is in Japan.)

Microsoft Entra Admin Center - Create Dedicated Connector Group: Enter name and region
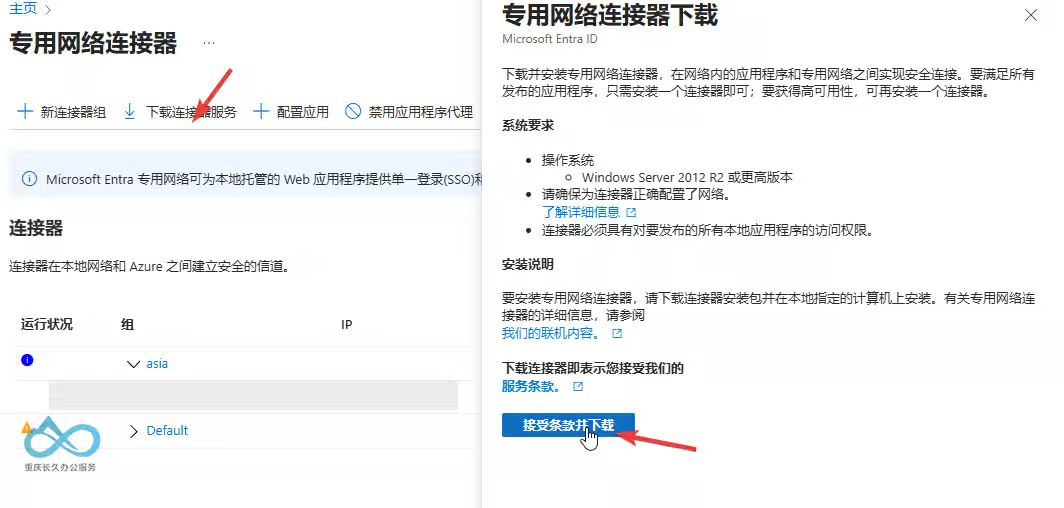
3. Install the On-Premises Connector Client
The connector is a lightweight client deployed internally to establish communication between the cloud proxy and internal apps.
Steps:
- On the connector group page, click Download Connector (for Windows).
- Run the installer and log in with a Microsoft Entra Global Administrator account.
- After installation, the connector automatically joins the previously created "asia" group (no additional configuration needed).
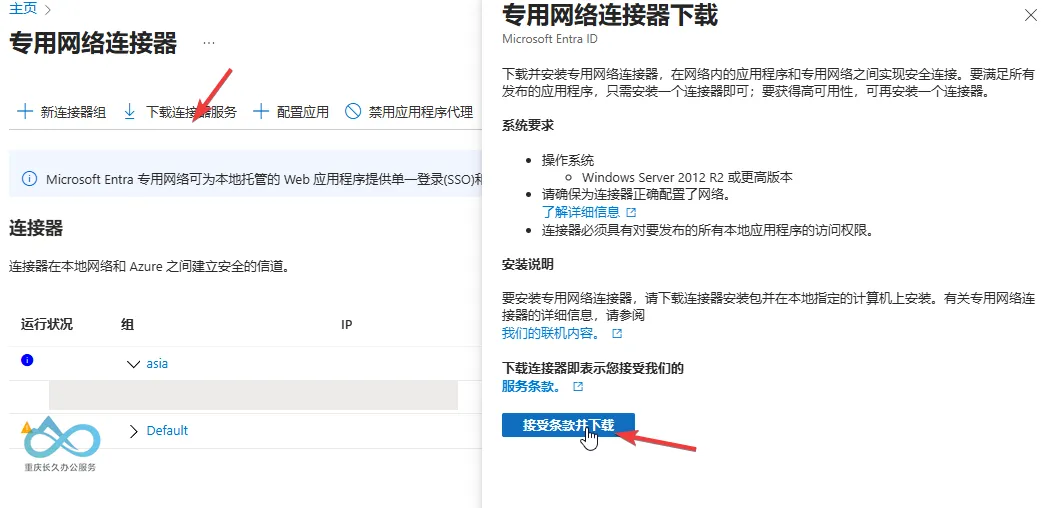
Microsoft Entra Connector Download: Click to download and install
4. Publish On-Premises Applications
(1) Configure Local DNS Resolution (Required for Internal URL)
The Internal URL (access address of the internal app) does not support direct IP addresses—it must use a local domain (e.g., 192.168.12.86.local.changjiu365.com). Therefore, you need to resolve the local domain to the internal app’s IP address (e.g., 192.168.12.86) via an internal DNS server (or router DNS settings, hosts file).
Example (Router DNS Settings):
- Log in to the router management interface (e.g.,
192.168.1.1). - Find DNS Settings → Local Domain Resolution (or "Hostname Mapping").
- Add a record:
- Hostname:
vaultwarden.local.changjiu365.com(custom local domain). - IP Address:
192.168.12.86(actual IP of the internal app).
- Hostname:
- Save the settings and ensure internal devices can access the app via this local domain (e.g., verify by entering
http://192.168.12.86.local.changjiu365.comin a browser).
Local DNS Host Resolution

(2) Configure Public DNS Resolution (Required for External URL)
The External URL is the custom domain used by users to access the internal app from the public internet (e.g., vw.changjiu365.com). It needs to point to the default domain of Microsoft’s On-Premises Application Proxy (format: *.msappproxy.net, available after creating the app).
Steps:
- Log in to your domain registrar’s DNS management interface (e.g., Alibaba Cloud, Tencent Cloud).
- Add a CNAME record for the custom domain (e.g.,
vw.changjiu365.com):- Host Record:
vw(or@for the root domain, depending on requirements). - Record Type:
CNAME. - Record Value: The default domain of Microsoft’s On-Premises Application Proxy (e.g.,
vw-{tenant}.msappproxy.net, available in the app’s Application Proxy Details → Custom Domain after creation).
- Host Record:
- Save the settings and wait for DNS propagation (usually 10-30 minutes).
Key Notes:
- Internal URL: Used by the on-premises connector to access the internal app; must be a local domain (e.g.,
192.168.12.86.local.changjiu365.com) and resolved to the internal IP via local DNS. - External URL: Used by users to access from the public internet; must be a public domain (e.g.,
vw.changjiu365.com) and resolved to Microsoft’s proxy default domain via public DNS.
(3) Create Application Proxy
Steps:
- Navigate to Microsoft Entra Admin Center → Apps → Enterprise Apps.
- Click + New App → Add an on-premises application.
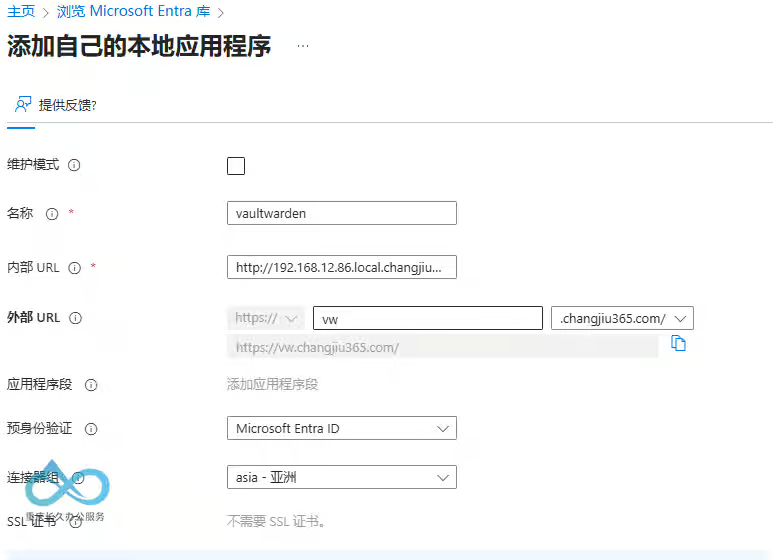
- Fill in the basic app information:
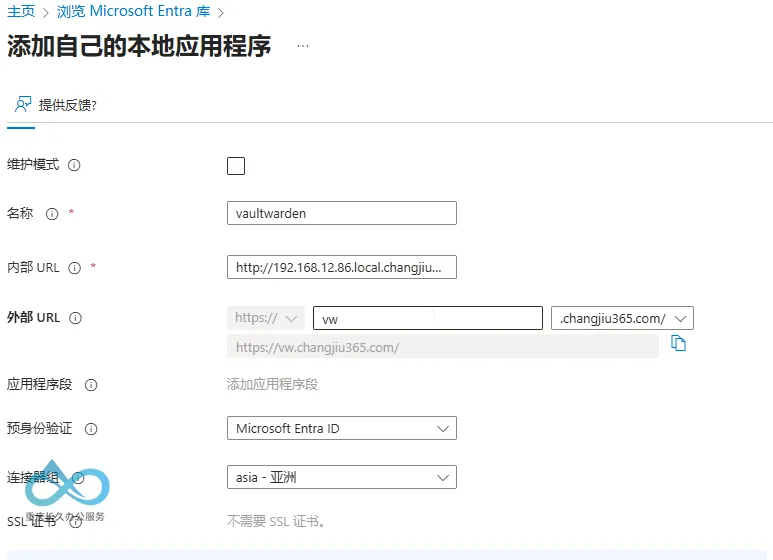
Microsoft Entra On-Premises Application Proxy Creation: Enter internal/external URLs and connector group - Name: App name (e.g., "vaultwarden").
- Internal URL: Access address of the internal app (e.g.,
http://192.168.12.86:80). - External URL: Custom domain (e.g.,
https://vaultwarden.example.com). - Connector Group: Select the previously created "asia" group.
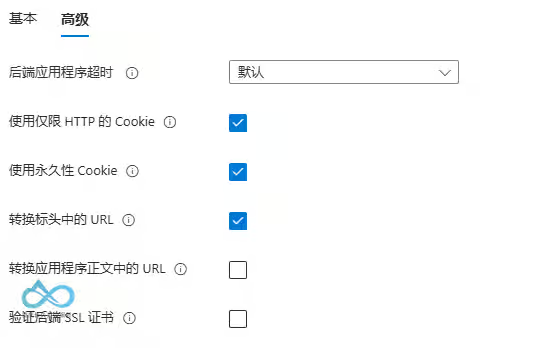
- Click Next to enter advanced settings:
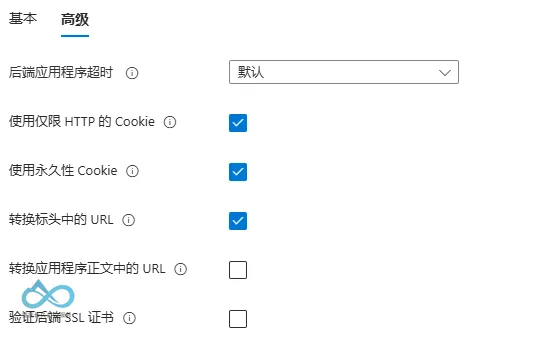
Microsoft Entra On-Premises Application Proxy Advanced Settings: Enable HTTP-only cookies and persistent cookies - Check Use HTTP-only cookies: Prevent client scripts from accessing cookies to avoid XSS attacks.
- Check Use persistent cookies: No need to re-login after browser restart (improves user experience).
- Click Create to complete the application proxy creation.
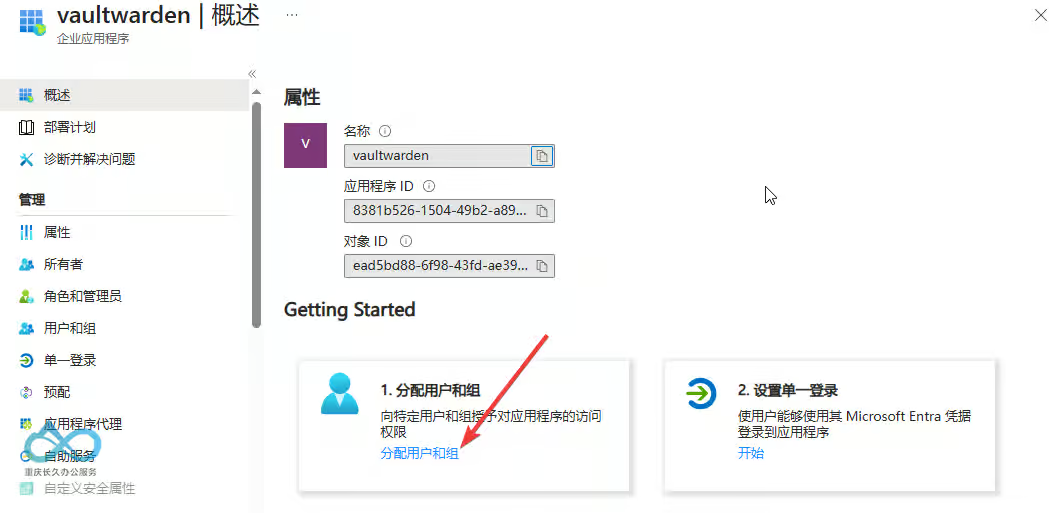
(4) Assign User/Group Access Permissions
By default, all users cannot access the newly created application proxy—you need to assign permissions manually:
- Go to the application proxy details page and click Assign users and groups.
- Click + Add user/group, select the users who need access (e.g., your own account), and click Assign.
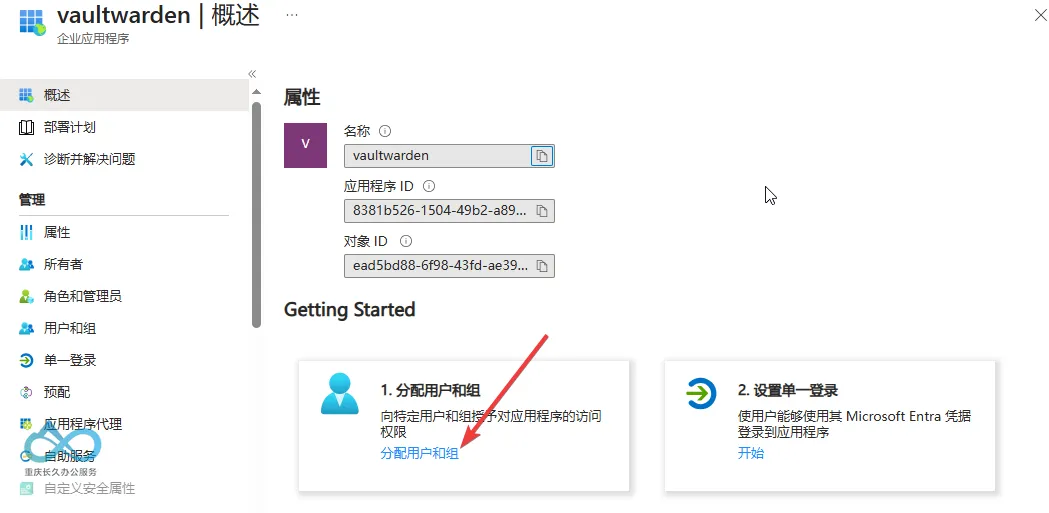
Microsoft Entra Application Proxy Permission Assignment: Add accessible users/groups
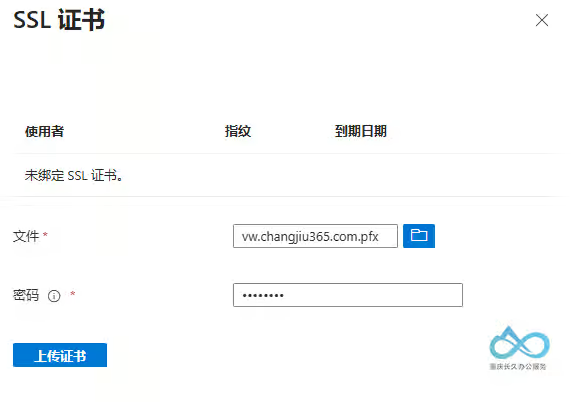
(5) Upload SSL Certificate (Required for Custom Domain)
If using a custom domain (e.g., vw.changjiu365.com), you need to upload a PFX-formatted SSL certificate (including private key) for HTTPS encryption:
- Go to the application proxy details page and click Custom Domain.
- Click Upload Certificate, select the local PFX certificate file, and enter the certificate password.
- Click Save—the certificate will be automatically bound to the custom domain.
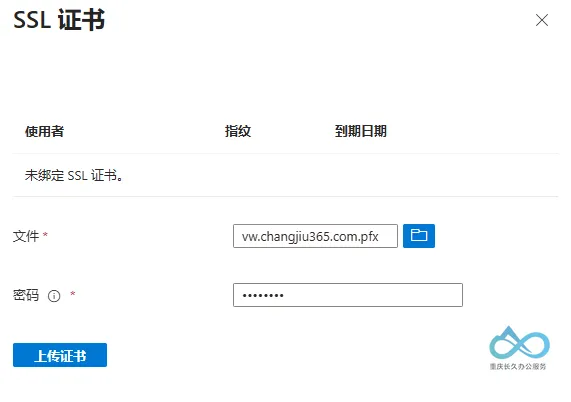
Microsoft Entra Application Proxy SSL Certificate Upload: Select PFX file and enter password
5. Post-Deployment Configuration and Verification
(1) Conditional Access Policy (Optional)
To enhance security, you can set up Conditional Access policies (e.g., only allow access from Intune-managed devices):
- Navigate to Microsoft Entra Admin Center → Security → Conditional Access.
- Click + New policy, enter a policy name (e.g., "Vaultwarden-Access-Policy").
- Select Cloud apps or actions → Select apps, and choose the previously created "Vaultwarden-Internal" app.
- Select Conditions → Device platforms (e.g., only allow Windows devices) or Locations (e.g., only allow corporate networks).
- Select Grant → Require device to be marked as compliant (requires Intune integration), and click Create.
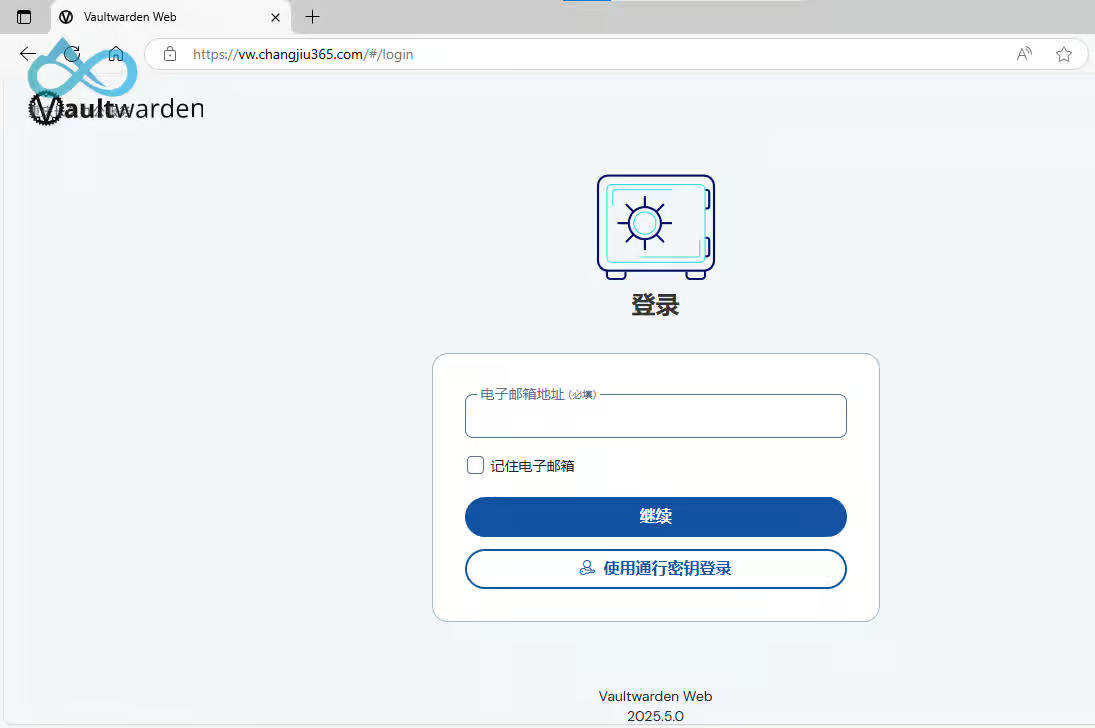
(2) Verify Access
- Open a browser and access the custom domain (e.g.,
https://vw.changjiu365.com). - You will be redirected to the Microsoft Entra login page. Enter your credentials to complete authentication (if you’re already logged in to a Microsoft account in the browser, you’ll be redirected directly without additional input).
- After successful login, you can access the internal Vaultwarden service.
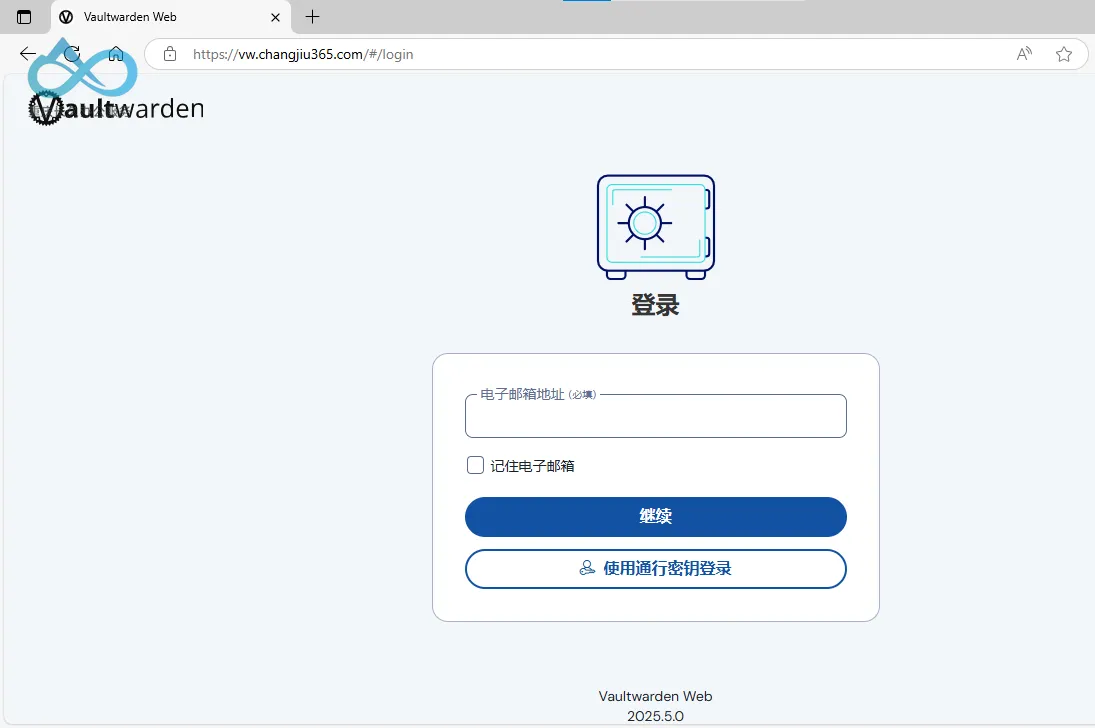
Vaultwarden Access Successful via Microsoft On-Premises Application Proxy: No re-login required after browser restart
Reference Documents:


Comment