WinPE Network Boot in 5 Minutes — Tiny PXE Server & Wimboot Guide
- 【Series】Easy Sysprep & Bulk Network Deployment Tutorial (Part 1): Win7 Imaging
- 【Series】Easy Sysprep & Bulk Network Deployment Tutorial (Part 2): 🚀 Win10/Win11 Imaging
- 【Series】Easy Sysprep & Bulk Network Deployment Tutorial (Part 3): FOG Project Deployment
- Complete Guide to Repackaging install.wim into an ISO (Win11 Enterprise Deployment)
- 🚀 Set Up WinPE Network Boot in 5 Minutes: A Tiny PXE Server + Wimboot Tutorial
Are you still running around making bootable USB drives for every computer? Whether you're an IT technician performing daily maintenance, a company handling bulk processing of old computers, or an enterprise deploying systems on newly procured equipment, booting into WinPE over the network can dramatically increase efficiency. Tiny PXE Server combined with Wimboot is a powerful solution that allows you to set up a WinPE network boot in minutes, providing a faster maintenance experience for DIY enthusiasts and IT professionals alike.
💡 This article is brought to you by "Chongqing Everlasting Office Services," dedicated to providing professional IT operations and office solutions for businesses.
I have uploaded the necessary resources for download. Scroll to the end of this article to get the link. The package is ready to use out of the box, no configuration needed!
🍀 What is Tiny PXE Server and What Does It Do?
Tiny PXE Server is a compact yet powerful network boot server tool. Traditionally, setting up a PXE network boot environment might require configuring complex DHCP/TFTP services or even deploying Microsoft's WDS. Tiny PXE Server, however, packs all these functions into a portable program of just a few hundred kilobytes. It's ready to use upon extraction, requiring no server OS installation. It supports various network boot protocols (DHCP, Proxy DHCP, TFTP, HTTP) and bootloaders (PXE, iPXE), enabling it to boot client computers in both BIOS and UEFI environments. This means any ordinary Windows PC can act as a PXE server, providing network boot services to other computers on the LAN. For DIY enthusiasts and technicians who need to maintain multiple computers, Tiny PXE Server is as handy as a Swiss Army knife.
Why choose Tiny PXE Server + WinPE? This combination allows us to boot into a minimal Windows Preinstallation Environment (WinPE) over the network to perform tasks like system installation, partition cloning, BIOS updates, and troubleshooting. Compared to booting from a USB drive one by one, the PXE method allows you to configure once and boot multiple devices on demand, saving time and effort. Let's walk through how to set up Tiny PXE Server with Wimboot to quickly boot WinPE.
🔗 Tiny PXE Server Official GitHub Page | 🔗 Developer's Blog
🛠️ Before You Start: What Do You Need?
Before configuring Tiny PXE Server, please prepare the following items (available for download at the end of this article):
- Tiny PXE Server Program: Download the latest version from the official website (a ZIP archive containing
pxesrv.exe and other files). The tool is portable and runs on Windows 7/10/11 and newer. - Wimboot File: Wimboot is a small bootloader from the iPXE project used to load Windows
.wim image files. Get thewimboot file (less than 100KB) from the official iPXE site. - WinPE Boot Files: You'll need the necessary boot files for WinPE, including BCD, boot.sdi, and boot.wim. The quickest way is to extract them from a Windows installation image.
- A PXE Server Computer: A Windows PC connected to the LAN via an Ethernet cable is recommended. Ensure its network is functioning correctly and consider disabling the Windows Firewall or opening necessary ports (DHCP: 67/68, TFTP: 69, HTTP: 80) to avoid blocking PXE communication.
- A Client Computer: At least one other computer that needs to be network booted. It should also be connected to the same LAN switch/router as the server. Enter its BIOS/UEFI settings to enable network boot (PXE Boot). You can also use a virtual machine to test the PXE boot.
- A LAN Environment: If your LAN already has a DHCP server (e.g., your router), you can use Tiny PXE Server's Proxy DHCP mode to avoid conflicts. If there is no DHCP service, Tiny PXE Server's built-in DHCP feature will assign IPs to clients.
Once you have everything ready, let's proceed with the configuration.
⚡ Configuring Tiny PXE Server for WinPE Network Boot
Follow these simple steps to set up your WinPE PXE boot environment:
Launch and Configure Tiny PXE Server: Extract the Tiny PXE Server archive and double-click
pxesrv.exe to run it. On the simple interface:- If your LAN already has a DHCP service, check the "ProxyDHCP" box. This way, Tiny PXE Server won't interfere with IP assignments and will only provide the necessary PXE boot information. If your LAN has no DHCP, uncheck this box to let Tiny PXE Server assign IPs directly.
- Check the "HTTPd" box to enable the built-in HTTP server (which improves transfer speed for large files). Ensure the "TFTPd" service is also enabled by default (there's no separate switch; it runs automatically when the server starts).
- The "Boot file" field should default to
ipxe.pxe. This is the included iPXE bootloader suitable for most BIOS/UEFI scenarios. Leave it as is; the software can automatically select the correct bootloader based on the client's architecture. - The "Filename if user-class=gPXE/iPXE" field defaults to
menu.ipxe. This tells iPXE clients to request a script namedmenu.ipxe as the boot menu. We will change this to use ourwimboot.ipxe file later.
Tip: Tiny PXE Server automatically detects and binds to your local IP address. If your server has multiple network cards, ensure the correct one is selected under the Options menu (e.g., "Bind to DHCP").
Prepare and Place WinPE Boot Files: By default, Tiny PXE Server serves files from the
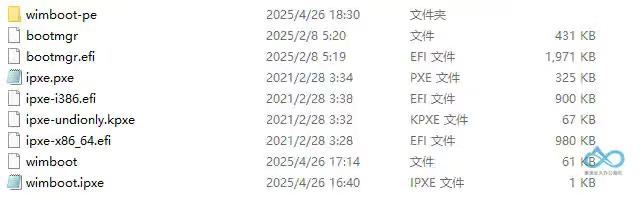
files folder located in the same directory aspxesrv.exe. Create a subfolder insidefiles, for example, wimboot-pe, and copy your prepared WinPE files into it. Your directory structure should look like this:PXESRV/ └─ files/ ├─ wimboot └─ wimboot-pe/ ├─ BCD ├─ boot.sdi ├─ boot.wim └─ bootx64.efiConfigure
config.ini for Wimboot: Here is an exampleconfig.ini file tailored for booting WinPE:[arch] 00000=undionly.kpxe ; Legacy BIOS 00006=ipxe-i386.efi ; UEFI 32-bit 00007=ipxe-x86_64.efi ; UEFI 64-bit 00009=ipxe-x86_64.efi ; UEFI 64-bit (includes some Macs) [dhcp] proxydhcp=1 ; Enable ProxyDHCP mode httpd=1 ; Enable HTTP service bind=1 ; Bind to a specific IP root=files ; Set the root directory for boot files filename=ipxe.pxe ; Default boot file altfilename=wimboot.ipxe ; Boot directly into WinPE via iPXEThe
[arch] section defines the boot file served based on the client's architecture code (DHCP option 93):00000 for legacy BIOS,00006 for 32-bit UEFI, and00007/00009 for 64-bit UEFI. This ensures compatibility across different hardware.Write the iPXE Boot Script: In the
files directory, create a text file named wimboot.ipxe with the following content. This script will be requested by the iPXE client.#!ipxe dhcp net0 set gateway 0.0.0.0 set boot-url http://${next-server} kernel ${boot-url}/wimboot initrd ${boot-url}/wimboot-pe/BOOTMGR BOOTMGR initrd ${boot-url}/wimboot-pe/BCD BCD initrd ${boot-url}/wimboot-pe/BOOT.SDI BOOT.SDI initrd ${boot-url}/wimboot-pe/bootx64.efi bootmgfw.efi initrd ${boot-url}/wimboot-pe/BOOT.WIM BOOT.WIM bootThis script instructs iPXE to:
- Load the
wimboot kernel. - Load the necessary WinPE files (
BOOTMGR,BCD,boot.sdi,bootx64.efi,boot.wim) into memory as an initial RAM disk (initrd). - Execute the
boot command to start WinPE from the in-memory image.
Note: File names are generally not case-sensitive, but ensure they are correct to avoid boot failures. I have updated the
wimboot kernel in the resource pack to the latest version (v2.8.0 from May 2, 2024) for better compatibility.- Load the
Start the Server and Boot the Client: Click the "Online" button in the Tiny PXE Server window. Now, on the client computer, enable PXE network boot and start it up, usually by pressing
F12 or another key to access the boot menu and selecting "Network Boot."- Get IP: The client will request an IP, and Tiny PXE Server will respond.
- Load iPXE: The client will download and execute the iPXE bootloader.
- Load WinPE: iPXE will then execute your
wimboot.ipxe script, downloading all the necessary WinPE files. - Boot into WinPE: Once the files are loaded, the client will boot into the WinPE environment, ready for maintenance.
Congratulations! You've successfully booted into WinPE over the network.
💡 Practical Tips
- Improve Transfer Speed: TFTP is slow for large files like
boot.wim. By enabling the HTTPd service in Tiny PXE Server and usinghttp:// paths in your iPXE script, you can significantly speed up the file transfer. - Check Memory Capacity: WinPE runs in RAM, so the client computer needs enough memory to hold the
boot.wim image. For a standard Windows 10/11 PE, at least 2GB of RAM is recommended, with 8GB or more being ideal for smooth performance. - Firewall and Security Software: If you encounter issues, check your server's firewall settings. Allow traffic on UDP ports 67/68 (DHCP), UDP 69 (TFTP), and TCP 80 (HTTP). Temporarily disable security software that might be blocking the server.
- Save Configuration: Tiny PXE Server saves its settings in
config.ini. You can edit this file manually (while the server is offline) for advanced configurations.
📌 Q&A
Q1: Does this setup support UEFI boot? A1: Yes. Tiny PXE Server automatically provides the correct EFI boot file (ipxe.efi) for UEFI clients. The process is similar to BIOS, but you may need to ensure your wimboot.ipxe script is tailored for UEFI (e.g., loading bootx64.efi). The provided package supports both modes.
Q2: Can I boot other tools besides WinPE? A2: Absolutely. You can add more menu items to your iPXE script to boot other systems or utilities. For example, you can boot a Linux installation ISO using sanboot or load cloning tools like Clonezilla by specifying their kernel and initrd files.
Q3: What if some hardware isn't recognized after booting into WinPE? A3: This is usually due to missing drivers in your WinPE image. You can either integrate the necessary drivers into your boot.wim file before deploying or load them manually in WinPE using the drvload command. Using a more recent version of WinPE (e.g., from a Windows 11 installation) can also provide broader default driver support.
📦 Resource Download
To help you get started quickly, I've prepared three packages:
Original Version: The latest release from the developer.

Only the essential executables and configuration files Basic Version: A minimal package with only the necessary wimboot configuration, allowing you to add your own
boot.wim.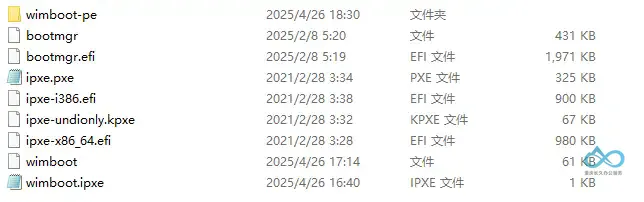
All files trimmed to the minimum required for Wimboot—study and tweak at will Enhanced Version: Includes a full-featured Win10 PE from the Wuyou forum, packed with utilities, drivers, and support for cameras, Bluetooth, printers, etc.

Lite pack (no boot.wim)


You can easily replace the boot.wim file in the /files/wimboot-pe/ directory to customize it.
🌟 Follow "Chongqing Everlasting Office Services" on WeChat and reply with "wimboot" to get the free download link! 🌟
Conclusion
You now have the complete workflow to quickly set up a WinPE network boot environment using Tiny PXE Server and Wimboot. This efficient method eliminates the need for bootable USB drives and streamlines bulk system deployment and maintenance.

Comment